The Split-Level Home Makes a Come Back

Photo Credit: Houzz

A split-level home is a style of house in which the floor levels are staggered. There are typically two short sets of stairs, one going up to a bedroom level, and one going down to a basement level. The basement level is usually at grade level or slightly below and finished, and often contains additional living area.  Sometimes there is an additional basement level, below grade, which is frequently unfinished. Split-level houses originated in the 1950s as an alternative to the one level ranch home.  The design proliferated in the 1960s particularly in the suburbs where sloped terrains and smaller lots could not necessarily accommodate a more sprawling ranch design.  No other architectural style elicits such reaction as the split-level home but long after the Brady Bunch era, this style is having a resurgence in popularity.

There are several reasons for the split-level’s increase in popularity:

  • Compared to more prolific architectural styles, like the colonial, dollar per square foot, the split-level gives you much more bang for the buck
  • The proportion of living space to bedroom space is usually greater in a split-level design versus other architectural styles which are more vertical like victorian styles
  • They usually have a more open floor plan with the kitchen, dining and living rooms in close proximity and often having no or partial walls
  • The garage is typically attached providing easy access to the home and not taking up valuable yard space for a detached garage
  • The “split”of the more formal entertaining spaces and more casual family spaces lends itself well to family living.  There is space for everyone!


For more information to go: http://www.urbansuburb.com.

Landscaping for Selling Success

IMG_0939.JPG

Before


IMG_2232.JPG

After


Provided by:

Cynthia Corhan-Aitken

Twig & Vine Design, LLC

http://www.twigandvinedesign.com


When the time comes to put your home on the market, there is a certain protocol that takes place.  A realtor comes in, walks the house, a price is decided upon and then it begins.

The decluttering phase!  Take away family pictures, clear the countertops in the kitchen to make it look bigger, clean the carpet, fix this, repair that.  But what about the outside of the house, does that go through the same process?  Shouldn’t it be decluttered and cleaned up as well, after all it is the first impression for a prospective buyer.

Since the first impression is the curb appeal, the entry to the front door should be carefully considered.  Looking back to when we bought the house we lived in, my first impression was not a good one.  When we drove up we could barely see the house for the 2 huge pine trees on either side of the front entry.  They covered the house and once inside made the house dark and dreary.  In addition, the landscaping in the back of the house as well as the front was overgrown and a bit of a bramble.  Luckily for our seller, the inside made up for the neglect of the outside and being a landscape designer and a big gardener, the outside offered a chance to really make a change and put a stamp of my own on a 100 year old house.  To make this point though, it turned out someone I know also looked at this house.  They were seriously considering it and were ready to make an offer but what held them back was the gardens, they thought it would need too much work and were frightened off by that.

In its overgrown state, it looked overwhelming and daunting.

So…how to landscape for selling success?  I am not a realtor nor a sales person of any sort but I do know curb appeal and here is my advice.  Stand in front of your house, maybe even look at it from across the street.  And look at it, really look at it.  Not like someone who has lived in it, has loved it, has emotional ties to it, look at it like someone will look at it with no emotion at all.  Now that you have done that, what do you see, what do you really see?  Are the front windows blocked by overgrown evergreens that have been there for years.  Are the hedges, leggy and spindly and just unattractive.  Are the shrubs overgrown, out of shape.  Maybe it is time for a good pruning?  Maybe it is time to declutter the yard and make the first impression of your house a happy and welcome one.   Once the garden “decluttering” has been accomplished think about adding some colorful annuals at the boarder.  They will bloom on and on and will continue to keep things looking nice.  In addition, consider adding some flowering pots for a finished look.

The only problem, once you are done you might not want to leave.

Have fun!


What To Do With An Underground Oil Tank In A Real Estate Transaction

Oil tank removal

According to the New Jersey Fuel Merchants Association there are over 100,000 buried oil tanks in New Jersey.  In my real estate dealings, addressing an underground oil tank is common practice.  The risk in buying a house with an underground oil tank is that it may have leaked.  It is not that uncommon for older underground oil tanks to leak oil into the surrounding soil or in extreme cases the ground water.  The party responsible for cleaning up a spill is the current home owner and most home owner’s insurance companies do not cover the clean-up.  Even oil tank warranty companies such as Proguard have restrictions and coverage limits.  That is why in representing buyers, I recommend that properties be checked for underground oil tanks and that the real estate contract stipulate that it is the seller’s responsibility to remove the underground oil tank.  And as a seller, if you have an oil tank, it is best to pro-actively remove it before even listing your house so that it won’t become an issue in the real estate transaction.

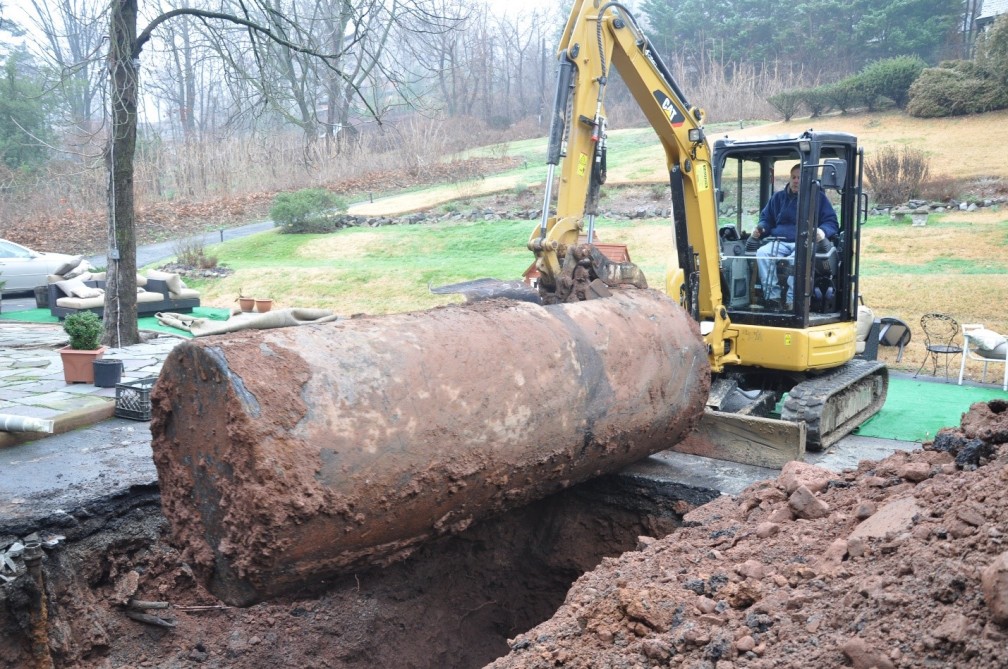
The following is some frequently asked questions and answers that were provided by NorRoc Enterprises, one of the environmental companies I recommend to remove underground oil tanks.  The picture above is actually the company removing a 1000 gallon oil tank from my property.  They can be reached at 973-541-9559 or norroc@optonline.net.

What is involved with removing an underground oil tank?

The first step is a site visit.  During this site visit, the representative will find the location and orientation of the oil tank and see if there is any fuel or water in the tank.  The field rep will also check for equipment access.  The next step is the permit process.  NorRoc applies for all permits from the local municipality which has up to 21 days to process the permits.  Once the permits are received, the process to remove the tank is only one day.  In a few short hours, the tank will be exposed, cut open and cleaned and then removed from the ground.  Once removed, the field crew waits for the arrival of the municipal inspector to approve the tank removal and excavation.  Once cleared, the area is backfilled with certified clean / virgin quarry soil.

How much does it cost to remove an underground oil tank?

The cost associated with an oil tank removal can vary depending on size, accessibility and remaining oil in the tank.  An average 550 gallon tank that is easily accessible and has no fuel remaining can cost approximately $1600 to remove without permits.  For a 1000 gallon tank the cost would be approximately $1800.  Towns can charge from $50-$279 for the permits and the cost is passed onto the customer.  There is no charge from NorRoc for getting the permits.

What happens if the oil tank leaked?

If the tank shows signs of leakage, the NJDEP (New Jersey Department of Environmental Protection) is contacted and a case number is issued.  Once the case number is issued, the NJDEP will require remediation be completed by a NJDEP certified contractor.  This contractor manages the process and the approvals required by NJDEP.   Remediation requires removal of all contaminated soil.  Soil samples are taken from the excavation and incorporated into a report that is issued to the NJDEP for approval.

How much can the clean-up cost?

Clean-up can range from $10,000 to $200,000 depending on the amount of soil that needs to be removed, if there is groundwater contamination and what further measures need to be taken per NJDEP protocol.

How long does the clean-up take?

Depending on the extent of the contamination, the clean-up can take a few days up to a few months.  If it is simply soil contamination, the field time can take 1-5 days with additional time for report writing, receipt of soil sample lab reports, disposal certificates etc.  In the event ground water is contaminated, that would be a case by case basis as monitoring wells would have to be installed and possibly a water treatment system.  This is an extensive process and it could take months to complete.

For more information go to www.urbansuburb.com


How to Make Your House Stand Out When It’s for Sale

house for sale

1. Start with the outside

Potential buyers will have an immediate impression of your house when they first drive up so make sure it is a good impression.

  • Mow the lawn
  • Re-sod or seed bare spots in the lawn
  • Rake fallen leaves
  • Trim the hedges and bushes
  • Weed flower beds and put down fresh mulch
  • Plant colorful flowers
  • Paint the front door to make it pop
  • Keep walks and steps clear
  • Make sure house number is visible from the street

2. De-clutter

A de-cluttered house feels roomier, so take this opportunity to get rid of stuff you don’t use and get a jump start on packing.

  • If you haven’t used it in over a year, consider donating, selling or throwing it away
  • Pack up the knick-knacks
  • Clear out shelves in bookcases and chose a few accent pieces to display
  • Pair down stuff in closets.  Overstuffed closets could signal a lack of storage
  • Make sure counters in kitchen and bathrooms are cleaned off
  • Keep kitchen appliances that aren’t used frequently in a closet or cabinet or pack away
  • If you have children, keep toys to a minimum
  • Consider renting a storage space or put off season clothes, accessories and decorations away neatly in the garage or attic
  • Remove excess furniture to make rooms look larger

3. De-personalize

You want potential buyers to visualize themselves living in the house so keep personal items to a minimum.

  • Pack away family photos, the kids art work and sports trophies
  • Put away religious items
  • If you have art work or photographs that might raise an eyebrow, consider taking it down
  • Now would also be a good time to re-evaluate very personal decorating choices.  If you just love that purple living room, use that color in your next house, but consider repainting your living room a more neutral color

4. Get organized

People will be coming through your house and opening closet doors and kitchen cabinets, make sure the contents are well organized.

  • In your linen closet, nicely fold towels and sheets and shelve items by color
  • In your closets, hang clothes together by category e.g., pants, shirts and dresses and make sure they are all facing the same way
  • In the kitchen cabinets, neatly stack dishes by size and pattern
  • In the pantry cabinets, organize contents by size and type of food
  • In the kids’ rooms, put away toys in boxes or bins
  • Clean out medicine cabinets
  • Put away mail and file personal documents in locked drawers
  • Weed out bulletin boards or wall organizers

5. Make minor repairs

If there are things you have been meaning to get to, now would be a great time to fix them so you can put your best foot forward.

  • Fix leaky faucets
  • Replace cracked or lose tiles
  • Re-caulk tubs, shower and sinks
  • Patch up holes in walls
  • Replace burnt out light bulbs
  • Fix doors and windows that don’t open or close properly
  • Fix kitchen cabinet doors and drawers that jam or don’t hang right
  • Replace broken panes of glass in windows

6. Make it shine

A clean house signals to potential buyers that the house is well cared for so make sure everything is spotless.

  • Clean out cobwebs
  • Clean light fixtures and ceiling fans
  • Shampoo carpets
  • Polish hardware in kitchen and bathrooms
  • Bleach dingy grout and rust stains in tubs and sinks
  • Put out fresh linens and towels
  • Wash windows inside and out
  • Power wash exterior
  • Make sure the house smells fresh and clean
  • Set out fresh flowers and/or potpourri

For more information go to www.urbansuburb.com